3 posts tagged with "Elixir"

View All Tags

· 7 min read

Let's make some games

In the previous parts to this blog series (Part I and Part II), we discussed the creation of GameBox, an Elixir application implemented as an Extism host, that provides an extensible platform for multi-player, turn-based games.

In this post, we're going to explore the nuts and bolts of writing some GameBox games! The best part about this is we can harness the power of the Extism Plug-in Development Kits (PDKs) to write our games in any number of languages that can be compiled into WebAssembly, even though GameBox itself is implemented in Elixir. This gives you, the game creator, the flexibility needed to unleash your creative power expressed in the programming language that best suits your passion and skills, all while ensuring the game platform itself remains secure, and the games themselves are lightweight and portable.

The Game API

As the game creator, you need only implement and export four basic functions that GameBox will call during the course of the gameplay. Let’s demonstrate this by creating a “game” which has a single button and shows the log of events coming into the game:
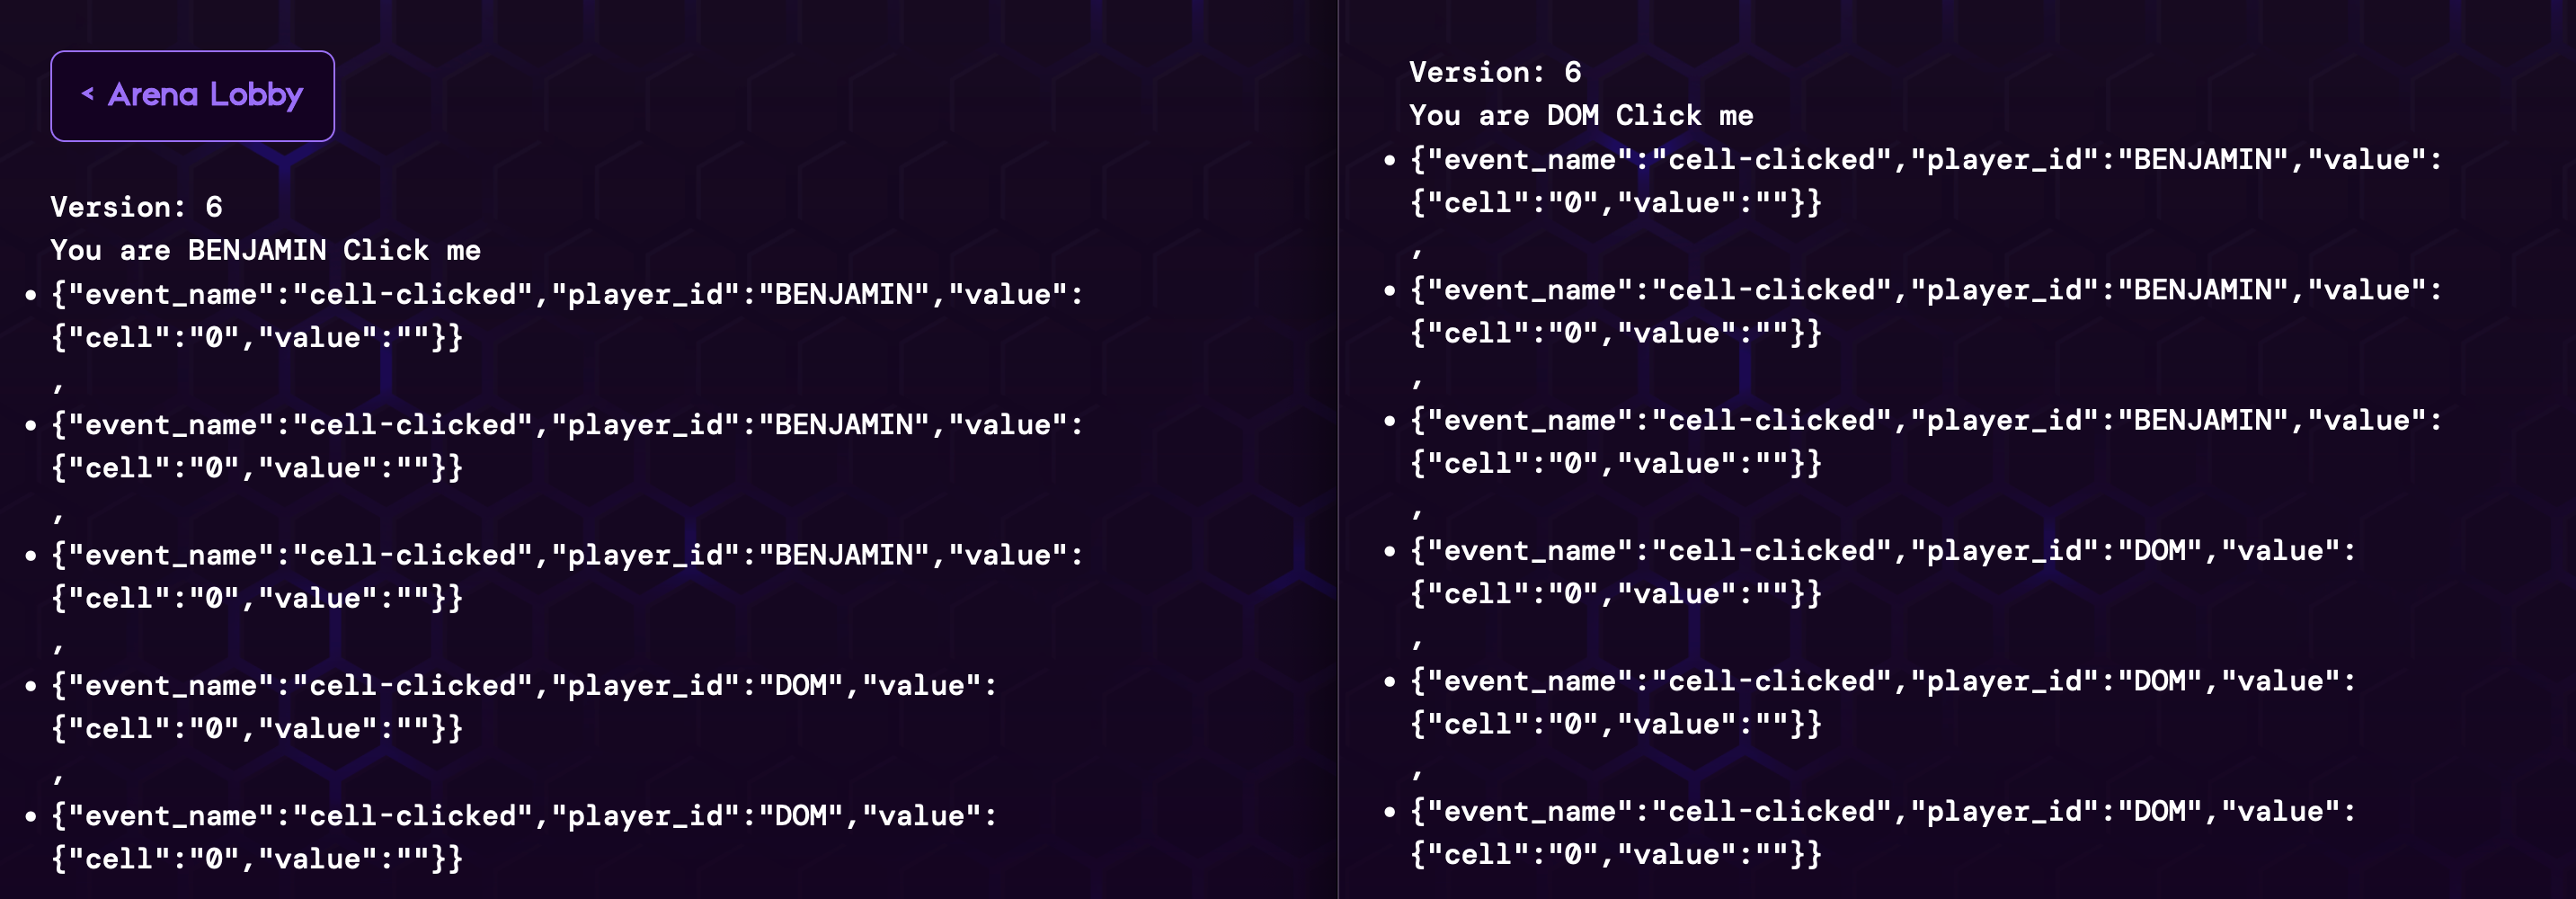
GameBox Screenshot

We’re going to write this in JavaScript for simplicity. Our JavaScript PDK still has a fairly primitive API for defining Extism functions. Different languages come with various levels of sugar to make it prettier. But this should be the easiest to follow.

Helpers

Let’s start with some helper functions. Currently GameBox expects you, the game programmer, to store the state of the game yourself. This can be accomplished with plug-in variables. So let’s make some helpers to get and set the state into a plug-in variable called “state”:

function set_state(state) {
Var.set('state', JSON.stringify(state))
}

function get_state() {
return JSON.parse(Var.getString('state'))
}
info

The variable doesn’t need to be JSON, but this is the easiest way to consistently store any JS object into bytes in this language.

This uses Extism’s Var.set and Var.getString to set and get the variable, and the data will persist between calls.

Interface Functions

Now with our helper functions ready to go, let's move on to the interactions with GameBox itself.

The first function that GameBox will invoke, get_constraints, provides it with some metadata about the constraints you want to apply as the game creator. Currently, these constraints are related to the minimum and maximum number of players, specified as integers, but additional constraints could be added in the future.

get_constraints(void) -> GameConstraints

function get_constraints() {
const constraints ={
min_players: 2,
max_players: 10,
}
Host.outputString(JSON.stringify(constraints))
}

Once all players are ready to start the game, GameBox will call init_game, passing in information about the players and allowing your game to allocate state, memory, and anything else required. Here we are only interested in the player_ids that are joining the game. We define our state and persist it with our set_state helper:

init_game(GameConfig) -> void

function init_game() {
const game_config = JSON.parse(Host.inputString())
const state = {
player_ids: game_config.player_ids,
events: [],
version: 0,
}
set_state(state)
}
info

The version property here will be incremented every time the game state changes. This will be used to tell the system to re-render the clients.

Next, the render function is called each time the game board needs to be rendered. It's called for each user watching or playing the game and each time the state version changes. You can render the game depending on who is viewing it by looking at the metadata on the user's socket. This is passed in as an object called assigns. For example, you will render the game differently based on who's turn it is and which screen it's being rendered on. By default the assigns will always have the player_id, but you can attach whatever you want to it. Take note this may be called for people who are only viewing the game and not playing, so you may want to conditionally render things like controls for those people.

render(Assigns) → String

function ui(state, assigns) {
const version = `<h1>Version: ${state.version}</h1>`
const youare = `<h1>You are ${assigns.player_id}`
const button = `<button phx-click="cell-clicked" phx-value-cell="0">Click me</button>`
// here we will just stringify the events we have received and log them in a list
const events = state.events.map(e => `<li>${JSON.stringify(e)}</li>`)

return `${version} ${youare} ${button} ${events}`
}

function render() {
const assigns = JSON.parse(Host.inputString())
Host.outputString(ui(get_state(), assigns))
}
info

You can attach any assigns you want to the user’s socket in handle_event , but by default it will always contain the version and the player_id

info

For simplicity sake we are just rendering the html using string interpolation. How you render the html is up to you. In tic-tac-toe for example, we use tera templates.

info

It's important to learn about LiveView to understand how the system works and how a game can be created.

And finally, during the course of the game lifecycle, GameBox will proxy any events (e.g. a player making a move, answering a trivia question, etc.) it receives to your game through handle_event and accept a return value that contains some player-specific information.

handle_event(LiveEvent) -> Assigns

function handle_event() {
const event = JSON.parse(Host.inputString())
const state = get_state()
state.events.push(event) // we're just pushing the event into this log
state.version += 1 // tell the system we need to re-render
set_state(state)
// for Assigns here, we only need the version
Host.outputString(JSON.stringify({ version: state.version }))
}

The shape of the input LiveEvent will depend on what Phoenix binding the user interacts with. In our case, with the button we defined, it will look something like this:

{
"event_name":"cell-clicked",
"player_id":"BEN",
"value":{
"cell": "0"
}
}

The return value, Assigns, can be anything you want it to be, but at a minimum it should contain the version. Any assigns you return will get attached to the user’s socket and passed back to you in render.

info

Your game should be viewed as a state machine that receives these events and updates the state until a state transition occurs and the rules change. See some of the example games to understand how this idea can be applied.


And that’s all folks! Of course, your game can be as simple or complex as you like, but the interactions between GameBox and your game are streamlined and simple.

For more details on the API check out the GameBox repo on Github, which also includes a few example games for reference.

What’s Next

While this is all fun and games, the implications are staggering when one thinks about the opportunity for user-generated content that becomes possible across a wide variety of applications when WebAssembly is in the mix. One need only look at Shopify functions as an example of an extendable eCommerce platform, or data platforms such as SingleStore that enable users to write their own data transformations that run right alongside the host code to further see the possibilities.

Whether you want to create an extensible platform of your own, or write plug-ins that extend another platform, Extism, the universal plug-in system, provides you with a powerful facilitation agent to orchestrate the magic on both sides.

Feeling inspired? We’d love to hear about your ideas. Join us on Discord!

· 4 min read

In Part I, we wrote a special Elixir GenServer that allows us to replace any GenServer in our Elixir apps with an Extism Plug-in. Our goal was to build a version of this turn-based game system that allows users of the platform to create and upload their own games.

Today we’re announcing the result, GameBox!

GameBox Screenshot

GameBox

GameBox is hosted on Fly.io and you can start creating and uploading games today. You can write your game in any language where we have PDK support. So far we’ve written games in JavaScript, TypeScript, and Rust. And we have people attempting games in Zig and Go.

If you want to see GameBox in action, we played a live game of Trivia with the entire audience at Wasm/IO in Barcelona this year. See the first few minutes of Steve’s talk here:

How it works

The primary technical concept behind GameBox is, as lifted from the previous post, about replacing a key GenServer implementation with an Extism plug-in. Like its inspiration, GameBox is built with the Phoenix framework and the GenServer we targeted to extend is LiveView. The LiveView module has a pretty simple API:

It's important to learn about LiveView to understand how the system works and how a game can be created.

LiveView LifeCycle

mount/3 is hand coded for the most part, but handle_info/3 and render/1 are proxied to the game plug-in to handle. You can think of the game as a single state machine. Events come in through handle_info and may or may not mutate the state. When the system needs to be redrawn, render is called and the game outputs some HTML.

Events are defined and triggered on the client using Phoenix bindings. The game programmer doesn’t need to code up a javascript front end, they just need to use the HTML bindings provided by Phoenix. For example, in tic tac toe, a button looks like this:

<button
phx-click="cell-clicked"
phx-value-cell="3"
class="cell">
</button>

When the user clicks this button, an event is sent to the handle_info callback of this shape:


{
"player_id": "benjamin",
"event_name": "cell-clicked",
"value": {
"cell": "3"
}
}

The game logic can interpret this message and mutate the state of the board by placing the player’s character (X or O) at cell index 3.

Game Logic

As mentioned before, the game developer creates a game by satisfying these callbacks. We provide an interface, a number of functions, that the game must export to plug-in to the GameBox system. Thanks to Extism, this interface can be implemented in any language we support.

Jump over to Part III of this series to get the details on how to make a game as a plug-in.

Credits

We got a lot of help from the community on this project and we want to thank all the individuals who put so much work into it:

  • Brian Berlin When we came up with the idea, We were a bit overwhelmed jumping back into Phoenix, but luckily Brian's expertise with Elixir got us far. After a week of hacking we had a solid protoype.
  • Revelry When we decided we wanted to step this up and make this a professional app, we turned to Revelry for help. In a few short weeks they were able to polish it into something we can be proud of.
  • Amy Murphy We also want to callout Amy on the Revelry team who went above and beyond making what are the coolest games on the platform.

· 5 min read

Part 1: Extism in Elixir

Since I built Elixir support into Extism, I've been thinking about how to demonstrate the power of combining the two.

I wanted to explore wrapping a Wasm module in an Erlang process and see what kind of interesting things you could create when you leverage OTP. Along the way, I discovered that the programming model of an Extism plugin maps almost perfectly to the GenServer behavior.

This has some powerful implications! In this two-part post, I'm going to show why. Our goal is to extend this awesome idea of a turn-based game engine created by Fly.io. With just a couple invocations of the Extism library, we will allow users to create and upload their own turn based games.

Part 1 of this post will be explaining how to use Extism in Elixir and how to create this magic Extism GenServer.

Setting up Extism

Install Depdendencies

All you need to get started is rustup and elixir. If you have these installed you can skip to the next section.

Use Docker

If you want a temporary Dockerized environment, run these commands:

mkdir /tmp/elixir-blogpost
cd /tmp/elixir-blogpost
curl https://extism.org/data/elixir-blogpost/Dockerfile > Dockerfile
docker build -t game_box .
docker run -it game_box bash

Create an Elixir project

Now let's create a new Elixir project with mix:

mix new game_box
cd game_box

Add Extism as a dependency in mix.exs

  defp deps do
[
# ...
{:extism, "~> 0.1.0"},
]
end

Fecth the deps and compile:

mix do deps.get, compile

This should kick off a rust build of the Extism package and runtime and it should end something like this:

Finished release [optimized] target(s) in 3m 39s
Generated extism app
Getting Support

If you do run into a problem at any point please file an issue or reach out on Discord.

Running a plugin

Let's test this out in a repl. Before we do that, let's pull down a compiled wasm plugin to execute: This is our "count-vowels" example plugin:

curl https://raw.githubusercontent.com/extism/extism/main/wasm/code.wasm > code.wasm

Now open an IEx repl:

iex -S mix

Paste in this code. This creates an Extism Context and loads the Plugin. Then it calls the count_vowels function on the plugin with a test string and returns the output of the plugin (which in this case is a JSON encoded result).

ctx = Extism.Context.new
manifest = %{ wasm: [ %{ path: "./code.wasm" } ]}
{:ok, plugin} = Extism.Context.new_plugin(ctx, manifest, false)
{:ok, output} = Extism.Plugin.call(plugin, "count_vowels", "this is a test")
JSON.decode!(output)

If all is working you'll see {"count" => 4} in the output string:

iex(5)> JSON.decode!(output)
%{"count" => 4}

Utilizing OTP

Okay, how do we turn this into a GenServer? There would be two approaches:

  1. Wrap the Extism.Context in the GenServer
    • Store the Context as the state
    • Provide callbacks to load and unload plugins
    • Provide callbacks to lookup and call those plugins
  2. Wrap the Extism.Plugin in the GenServer
    • Store both the context and the plugin as state
    • Provide callbacks to load and reload the plugin code
    • Provide callbacks to call functions on the plugin
What is a Context?

You can think of a Context as an arena of plugins. When a plugin is loaded, the context owns that plugin and is responsible for freeing it. Freeing a context frees all its plugins.

I went with #2 here because I think it's more granular and allows for more flexibility and concurrency. There isn't much overhead to have one context per plugin so it's okay to do it this way.

With that in mind, I implemented this barebones GenServer in lib/game_box.ex. Go ahead and copy paste it into that file:

defmodule GameBox.PluginServer do
use GenServer

@impl true
def init(_init_arg) do
ctx = Extism.Context.new()
# as our state we will store a {Extism.Context, Extism.Plugin} tuple
{:ok, {ctx, nil}}
end

# This special call is for loading or reloading a plugin given a manifest
@impl true
def handle_call({:new, manifest, wasi}, _from, {ctx, plugin}) do
# if we have an existing Plugin let's free it
if plugin do
Extism.Plugin.free(plugin)
end
# Load a new plugin given the manifest and store it in the new state
{:ok, plugin} = Extism.Context.new_plugin(ctx, manifest, wasi)
{:reply, {:ok, plugin}, {ctx, plugin}}
end

# this is a generic way to proxy messages to the underlying Extism.Plugin module
# we're mostly going to use `call` here:
# e.g. call_details = {:call, "count_vowels", "this is a test"}
@impl true
def handle_call(call_details, _from, {ctx, plugin}) do
[func_name | args] = Tuple.to_list(call_details)
response = apply(Extism.Plugin, func_name, [plugin | args])
{:reply, response, {ctx, plugin}}
end
end

Okay, let's try the count vowels example again but now with a GenServer. Start the repl again:

$ iex -S mix

iex(1)> {:ok, pid} = GenServer.start_link(GameBox.PluginServer, nil)
{:ok, #PID<0.220.0>}
iex(2)> GenServer.call(pid, {:new, %{wasm: [%{path: "./code.wasm"}]}, false})
{:ok,
%Extism.Plugin{
ctx: %Extism.Context{ptr: #Reference<0.584822572.876216322.21881>},
plugin_id: 0
}}
iex(3)> GenServer.call(pid, {:call, "count_vowels", "this is a test"})
{:ok, "{\"count\": 4}"}

Now we're doing the same thing as before, but instead of invoking a function on the plugin, we're invoking it on a pid. What does this inversion give us exactly? Well, because it's a pid, it can live anywhere in your cluster. And it can be supervised and registered by OTP.

This also means we can replace any GenServer in our application, or in a framework like Phoenix, with a Wasm module. This would allow your customers to extend your application or maybe allow you to write part of your Elixir application in a language better suited to the task of the GenServer you are replacing.

Check out part II of this blog series where we show how this PluginServer can be used like a Phoenix.LiveView module.

We also invite you to get in on the action! Join us on Discord.